Our drag and drop Kivy UI Designer generate Kivy code allows users create mature and professional UIs and apps without needing to write Kivy code. The MD Python Designer includes seven designers the Kivy, PySide2, Flet, Tkinter, Custom Tkinter, MD Python and MatDeck Script Designers.
What is Kivy?
Kivy is a popular cross-platform GUI library which has been widely used since its release in 2011. It’s one of the only Python GUI libraries which supports mobile development for both Android and iOS. Kivy is widely popular thanks to both its cross-platform capabilities as well as polished and modern UI look, it is relatively simple to code in and alongside Tkinter, it is the most used Python GUI library.
Why use Kivy?
Kivy is one of the most popular Python GUI libraries for many reasons:
- Allows user to create mobile applications for iOS and Andoird
- One code base can be deployed across all platforms such as Linux, Windows, macOS and more
- Consistent UI look and feel across all platforms
- Additional functionality and customisation from libraries such as KivyMD
- Highly tested and established GUI library
KivyButton Click Event
This example shows a basic Kivy button that calls a function when clicked. It’s a simple demonstration of event binding in Kivy and how logic is connected to UI elements. This is a foundational concept in building interactive applications.
from kivy.app import App
from kivy.uix.button import Button

class ButtonApp(App):
    def build(self):
        return Button(text="Click Me", on_press=self.on_click)

    def on_click(self, instance):
        print("Button was clicked!")

ButtonApp().run()
Text Input to Label Update with Kivy
This app allows the user to enter text into a text box and click a button to update a label below. It demonstrates how to retrieve text input and change widget properties programmatically. This pattern is common in form processing and live UI updates.
from kivy.app import App
from kivy.uix.boxlayout import BoxLayout
from kivy.uix.textinput import TextInput
from kivy.uix.label import Label
from kivy.uix.button import Button

class TextUpdateApp(App):
    def build(self):
        self.layout = BoxLayout(orientation='vertical')
        self.input = TextInput(hint_text="Enter text here")
        self.label = Label(text="Waiting for input...")
        button = Button(text="Submit", on_press=self.update_label)

        self.layout.add_widget(self.input)
        self.layout.add_widget(button)
        self.layout.add_widget(self.label)
        return self.layout

    def update_label(self, instance):
        self.label.text = self.input.text

TextUpdateApp().run()
Simple Calculator in Kivy
This is a basic calculator GUI with a text display and buttons for digits and operators. It evaluates math expressions using Python’s eval() function and shows how to bind many buttons to shared logic. Useful for creating lightweight tools or input processors.
from kivy.app import App
from kivy.uix.gridlayout import GridLayout
from kivy.uix.textinput import TextInput
from kivy.uix.button import Button

class CalculatorApp(App):
    def build(self):
        self.expr = ""
        layout = GridLayout(cols=4, spacing=10, padding=10)
        self.display = TextInput(text="", readonly=True, multiline=False, halign="right", font_size=32)
        layout.add_widget(self.display)

        buttons = [
            "7", "8", "9", "/",
            "4", "5", "6", "*",
            "1", "2", "3", "-",
            "0", ".", "=", "+",
        ]
        for label in buttons:
            layout.add_widget(Button(text=label, on_press=self.on_button))

        layout.add_widget(Button(text="C", on_press=self.clear_expr))
        return layout

    def on_button(self, instance):
        if instance.text == "=":
            try:
                self.expr = str(eval(self.expr))
            except:
                self.expr = "Error"
        else:
            self.expr += instance.text
        self.display.text = self.expr

    def clear_expr(self, instance):
        self.expr = ""
        self.display.text = ""

CalculatorApp().run()
Kivy Table Data Display
This example displays structured data using a GridLayout that simulates a basic table. It’s helpful for showing lists, databases, or spreadsheet-like information in a readable format. While not editable, this is a common way to represent tabular data in Kivy.
from kivy.app import App
from kivy.uix.gridlayout import GridLayout
from kivy.uix.label import Label

class TableApp(App):
    def build(self):
        layout = GridLayout(cols=3, padding=10, spacing=10)
        headers = ["ID", "Name", "Score"]
        data = [["1", "Alice", "90"], ["2", "Bob", "85"]]

        for header in headers:
            layout.add_widget(Label(text=header, bold=True))

        for row in data:
            for item in row:
                layout.add_widget(Label(text=item))

        return layout

TableApp().run()
Kivy Canvas for Drawing Shapes
This example shows how to use Kivy’s canvas to draw basic shapes like rectangles and ellipses. It’s useful for making custom visual elements or graphics-heavy applications like games or editors. Drawing with Kivy’s canvas provides pixel-level control.
from kivy.app import App
from kivy.uix.widget import Widget
from kivy.graphics import Rectangle, Ellipse, Color

class DrawingWidget(Widget):
    def __init__(self, **kwargs):
        super().__init__(**kwargs)
        with self.canvas:
            Color(1, 1, 1, 1)
            Rectangle(pos=(50, 50), size=(200, 100))
            Color(0.4, 0.6, 0.9, 1)
            Ellipse(pos=(70, 60), size=(160, 80))

class DrawingApp(App):
    def build(self):
        return DrawingWidget()

DrawingApp().run()
Kivy Toolbar with Action Buttons
This example creates a top toolbar with Help and Exit buttons using BoxLayout. It demonstrates layout management and integrating auxiliary actions. You can extend this to include navigation controls, settings access, or status indicators.
from kivy.app import App
from kivy.uix.boxlayout import BoxLayout
from kivy.uix.button import Button
from kivy.uix.label import Label
from kivy.uix.popup import Popup

class MenuApp(App):
    def build(self):
        layout = BoxLayout(orientation='vertical')
        toolbar = BoxLayout(size_hint_y=0.1)

        help_btn = Button(text="Help", on_press=self.show_about)
        exit_btn = Button(text="Exit", on_press=self.stop)

        toolbar.add_widget(help_btn)
        toolbar.add_widget(exit_btn)

        layout.add_widget(toolbar)
        layout.add_widget(Label(text="Main content goes here"))

        return layout

    def show_about(self, instance):
        popup = Popup(title="About", content=Label(text="This is a Kivy menu example."), size_hint=(0.5, 0.3))
        popup.open()

MenuApp().run()
Kivy File Picker and Reader
This example opens a file dialog and loads the selected file’s text content into a label. It uses plyer for cross-platform file access. This setup is ideal for loading documents, logs, or simple configuration files into a GUI.
from kivy.app import App
from kivy.uix.boxlayout import BoxLayout
from kivy.uix.button import Button
from kivy.uix.label import Label
from plyer import filechooser

class FilePickerApp(App):
    def build(self):
        self.layout = BoxLayout(orientation='vertical')
        self.label = Label(text="Select a text file.")
        btn = Button(text="Open File", on_press=self.open_file)

        self.layout.add_widget(btn)
        self.layout.add_widget(self.label)
        return self.layout

    def open_file(self, instance):
        filechooser.open_file(on_selection=self.load_text)

    def load_text(self, selection):
        if selection:
            with open(selection[0], 'r') as f:
                self.label.text = f.read()

FilePickerApp().run()
Intermediate Progress Bar in Kivy
This shows an animated, looping progress bar that gives feedback when a task duration is unknown. Start and Stop buttons control the animation. This is useful for loading screens, background processes, or network operations where timing is uncertain.
from kivy.app import App
from kivy.uix.boxlayout import BoxLayout
from kivy.uix.button import Button
from kivy.uix.progressbar import ProgressBar
from kivy.clock import Clock

class ProgressApp(App):
    def build(self):
        self.layout = BoxLayout(orientation='vertical')
        self.pb = ProgressBar(max=1000)
        self.running = False

        start_btn = Button(text="Start", on_press=self.start_progress)
        stop_btn = Button(text="Stop", on_press=self.stop_progress)

        self.layout.add_widget(self.pb)
        self.layout.add_widget(start_btn)
        self.layout.add_widget(stop_btn)
        return self.layout

    def start_progress(self, instance):
        if not self.running:
            self.running = True
            self.event = Clock.schedule_interval(self.update_bar, 0.01)

    def stop_progress(self, instance):
        self.running = False
        if hasattr(self, 'event'):
            self.event.cancel()

    def update_bar(self, dt):
        self.pb.value = (self.pb.value + 10) % self.pb.max

ProgressApp().run()
Kivy Tabbed Interface
This app uses TabbedPanel to separate content into multiple tabs. Each tab contains different content, ideal for settings, dashboards, or feature switching. This layout is common in professional tools and mobile apps for organizing multiple screens.
from kivy.app import App
from kivy.uix.tabbedpanel import TabbedPanel, TabbedPanelItem
from kivy.uix.label import Label
class TabApp(App):
def build(self):
panel = TabbedPanel()
panel.do_default_tab = False
tab1 = TabbedPanelItem(text='Home')
tab1.add_widget(Label(text='This is the Home tab.'))
tab2 = TabbedPanelItem(text='Settings')
tab2.add_widget(Label(text='Settings go here.'))
tab3 = TabbedPanelItem(text='About')
tab3.add_widget(Label(text='About information.'))
panel.add_widget(tab1)
panel.add_widget(tab2)
panel.add_widget(tab3)
return panel
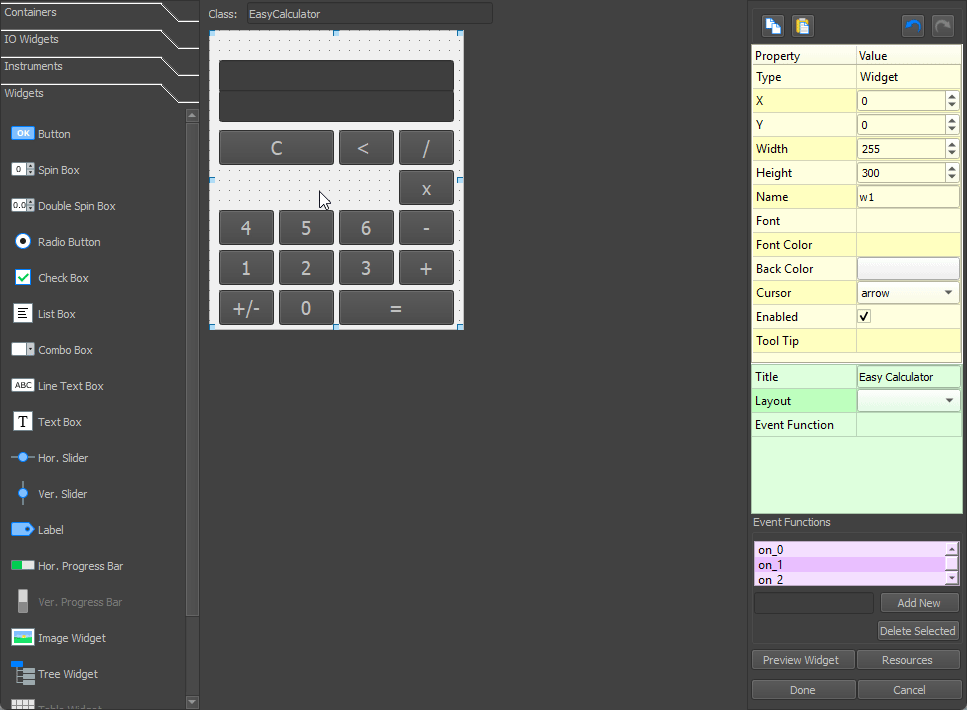
TabApp().run() Drag and Drop Kivy GUI Designer
Our Kivy GUI Designer focuses on simplicity and efficiency, its drag and drop functionality allows users to create their GUI in a few minutes and make changes in a few seconds, this ensures that all variations and GUI prototypes can be made without any stress. The Kivy GUI Designer generates all the needed code and removes the need for tedious debugging and slow code development. We can see a basic Kivy GUI below.

This example showcases the adaptability of Kivy apps with the GUI being able to fit any size of monitor and screen. With the Kivy GUI Designer, you can speed up the creation of your app while having the benefit of Kivy’s cross-platform ability without needing to hire a full development team.